
RoCanvas.js - Create Interactive Drawing Boards
What Is RoCanvas
A small and easy to embed javascript class for creating interactive drawing boards on your page. Add it to your site and let your visitors draw anything they want. With some server-side programming you can save their drawings to the server, create galleries, contests, let them draw their avatars, or create a cool lovely site like Draw a Pig.
Current version: 1.4.0
Please note rocanvas.js is pure Javascript and is not a new version of the former "RoCanvas HTML5 Component". If you want to upgrade from the component you will need to change your on-page HTML.
Download RoCanvas
Click here to download the full source code (.zip, 9KB)
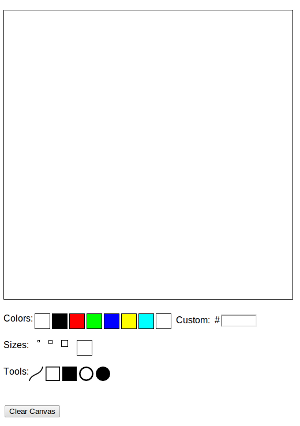
See demo of how RoCanvas works (or click on the picture)
RoCanvas is also hosted at Githib. Visit the RoCanvas repository and click on the Downloads button at right to download .zip or tar.gz.
Forks are welcome!
Installation and Integration + Minimal Example
1. Download the zip file or checkout the Github repository given in the Download section above
2. Decompress (unzip) the directory and upload it on your server.
3. Include the RoCanvas CSS file in the header of your page:
<link rel="stylesheet" href="rocanvas/rocanvas.css?v=1.0">
You may need to change the path depending on your installation.
4. Include rocanvas.js at the bottom of your page:
<script src="rocanvas/rocanvas.js"></script>
5. Create a canvas element on your page:
<div><canvas id="sampleBoard" width="500" height="500" style="border:1pt solid black"></canvas></div>
6. Create an instance and call RoCanvas.Ro() to convert your canvas element into a RoCanvas Drawing Board:
var r=new RoCanvas;
r.RO("sampleBoard");
If you want to create more than one drawing board on the page or use more advanced settings read the next section.
Configuration Options
When called without arguments RoCanvas creates a drawing board using the pre-defined settings. However you can fully control the toolbars and defaults that RoCanvas uses if you pass a second arguments which is a javascript object in the following format
r.Ro(canvasID, properties);
The below sections will give an example and explain the possible properties of the properties object:
Example:
var r2=new RoCanvas;
r2.RO("sampleBoard2", {
	"toolbar": {
	   colors: ["pink", "#FFF","#000","#FF0000","#00FF00","#0000FF","#FFFF00"],
	   custom_color: false,
		tools: ['path', 'circle', 'rectangle'],
		sizes: null,
		saveButton: {"text": "Save", "callback": "testSave(r2);"}
	},
	"settings": {
		color: 'pink'
	}
});
Toolbar
You can pass a custom object called "toolbar" and define all of the following elements. If you omit the whole "toolbar" object, the default one will be shown.
- "colors" - array of color choices. Colors can be passed as words or as hex values. If you omit "colors" from your toolbar object the default ones will be shown. If you pass null the user will not be allowed to change the colors at all.
- "custom_color" - boolean, accepts true or false. If set to true, the user is given an option to create custom color. Defaults to true.
- "tools" - array of tools to be displayed. Possible and default values: "path","rectangle","filledrectangle","circle","filledcircle". If omitted, the default set will be shown. If passed null tools will not be shown and the user will be able to use only "path" tool.
- "sizes" - array of brush sizes in pixels. Defaults to [2, 5, 10, 25]. If omitted, the defaul ones will be given. If set null no size change will be allowed.
- "clearButton" - Javascript object with property "text". Will display "Clear canvas" button to allow the user clear the drawing board and start again. If omitted, the default one with "Clear canvas" text will be shown. If set null, no clear button will be shown.
- "saveButton" - Javascript object with properties "text" and "callback". Will display "save" button under the drawing board.
- "text" property defines what text will be displayed on the button
- "callback" is a javascript function which will save the drawing data on your server. It's recommended to pass the current RoCanvas instance to the function so you can use the function serialize(). The function returns serialized data that can be sent by ajax or POST to a server-side script and stored on the server.
Settings
In addition to toolbar, you can pass "settings" object with some defaults:
- "shape" - the default shape to start with. Possible values: "miter", "round", or "bevel". Can't be changed by the user.
- "color" - the default color to start with - as word or hexadecimal value.
- "tool" - the default drawing tool to start with. Possible values: "path","rectangle","filledrectangle","circle","filledcircle"
- "lineWidth" - the brush size in pixels
More Than One RoCanvas On the Page
You can create unlimited number of RoCanvas drawing boards on the page by simply creating roCanvas instances and calling RoCanvas.Ro on each of them. Make sure to pass the HTML5 canvas ID to each constructor. Example:
var r1 = new RoCanvas;
r1.Ro('board1');
var r2 = new RoCanvas;
r2.Ro('board2');
var r3 = new RoCanvas;
r3.Ro('board3');
And of course you can pass different properties object to each instance. It's highly recommended to place each canvas elements in its own div, table cell or other wrapper so their toolbars are properly displayed under them. The toolbars are added to the parent DOM element so if there are no wrappers, they may be shown at the bottom of the page.
How To Save The Drawing On The Server
You can add URL to a server-side script in the ajax call in the RoSave javascript function. Your script will receive the values as POST variables. The image data comes in Data/URI format. You can save this data directly in a TEXT or BLOB field in your SQL database or save it as file (see in the comments).
If you choose to store the Data/URI value in a BLOB field, simply output it in <img src= tag. For example in HTML/PHP this would look something like:
<img src="<?php echo $image['image_data']?>">
Below in the comments you can find how to save Data/URI in a file using PHP.
Why "RoCanvas"?
The name RoCanvas comes from Robot and Canvas. The reason is that this drawing board component was first used for our Draw a Robot application. You can check it to see how RoCanvas works in live app. (Right now it runs the older HTML5 drawing board component. See the demo for more recent sample.
License
This component is licensed under Apache license which in short means you can use it even in commercial applications.Note that some code has been inspired or inherits the code given in this tutorial.