
How To Make a Waddle Duck Toy
Don't Shoot The Duck, It Walks The Best It Can!
The waddle duck is a very simple mechanical toy - it does not have even a cam mechanism. The waddling duck is powered by simple physics - gravity power and friction. The video below explains the physics in great details and also shows what kind of funny simple toy we are going to make:
Tools and Materials Needed
The best material for this toy is wood although you can make the duck also from thick cardboard. Anyway, the list below assumes wood. As we have no exact size plans yet, the dimensions of the duck may vary and the measures are not exact. I promise to share full size drawings soon.
- 2 wooden tablets, something like 20cm x 20cm should be more than enough. Thickness of 3-4mm will be sufficient. Plywood is also fine. You will cut out the duck body from them.
- 1 - 2 laths or a long and narrow plywood piece for the platform. The platform will be between 30cm and 50cm long.
- A small wooden tablet for the legs (possibly you may use what's left from the body parts)
- A pencil (to connect the two pieces of the duck body)
- Nails, tacks and/or glue
- Some paint or colored foil for decorating the bird.
- A saw, sandpaper, knife, chisel, and brace.
Of course you can manage with less tools, but the idea to have fun and feel comfortable, not to fight for 2 days with one stupid duck or cut your fingers while making it.
Figure 1: Cutting Out the Body
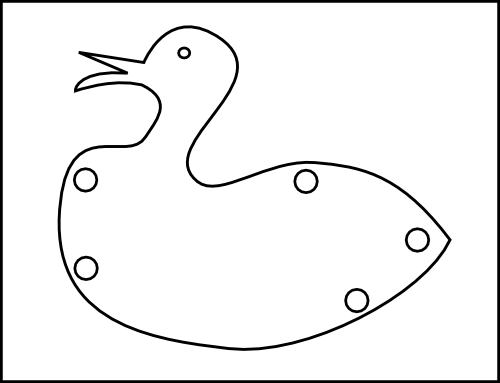
Feel free to print out the picture in the appropriate size but you don't have to stick to it exactly. If you decide to draw your own, make sure the duck is fat as this will allow better balance. The circles (except the eye) just show where this part of the body will be connected to the other part by glued or nailed 1-2 cm long pencil pieces. You don't have to use pencil, but I figured out it's a good choice to connect the two body parts. The weight of the pieces should be slightly exceeding the thickness of the duck legs so the second leg can move freely within the body.
Figure 2: The Legs and The Stopper
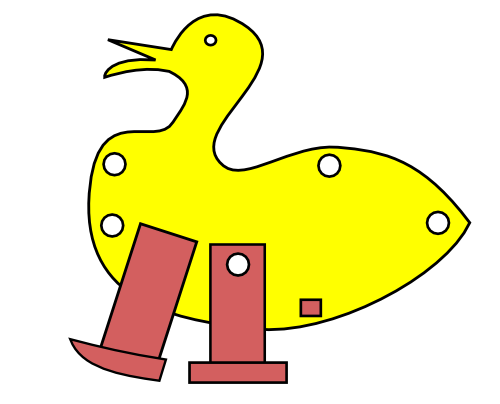
This is the tricky part. The duck has two legs just like a real duck. The front leg is static and you can even use it as additional connection between the two parts of the body. It can be glued and nailed just like the pencil parts. I recommend you to first attach this leg as shown on the figure otherwise you will not be able to balance the duck properly.
Once the static leg is attached, you need to find the position of the dynamic leg. It should be able to keep the entire duck balanced on it (see also the video) so you may need to try different positions - usuing a scotch tape to temporary fix the leg is a good idea. One you have found the position you can place a piece of pencil there and make sure it passes through the hole in the dynamic leg so the leg can move freely.

Optionally you can put a stopper at 1-2 incles behind the dynamic leg to force-stop the straddle. This however is usually not needed as the gravity forces do the work when you put the duck to walk on the platform.
Figure 3: The Ready Waddle Duck
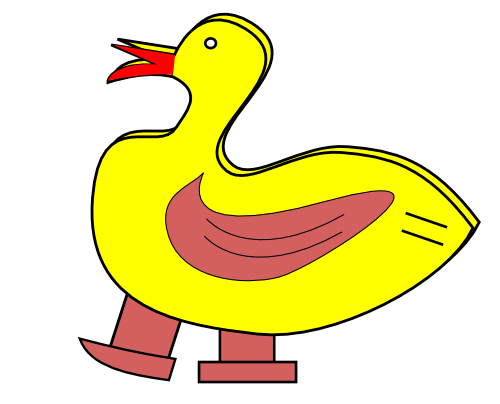
This is just a sample look of the whole duck with some decoration. You can paint some wings or attach them from other material. If attaching wings be careful not to violate the balance. I've painted the neb in red but that's not really as important.
Figure 4: The Platform
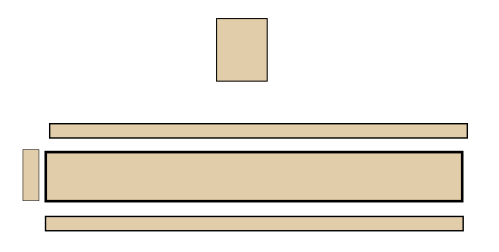
Here are the five pieces that you need to cut out from the wooden tablet to make a sloping platform. It should be slightly wider than the duck itself. The footrest can be about 10cm high and the two little laths on the side will play the role of a containment. See the movie again to get a better idea.
Basically, that's all! Your waddling duck mechanical toy is now ready. If you have found the balance you should be able to see the duck waddling down and looking for food! When I make mine perfect enough I'll post precision drawings along with a movie too! Meanwhile maybe you'll prefer to get a ready waddle duck push toy or to learn how to make cam toys.