
How To Make a Hatching Cam Toy
Visual Guide For Kids And Adults
In this tutorial we'll make the hatching cam toy from our own article. When looking at the animation there you can say it's quite simple to make this toy. In fact it's really one of the simplest cam toys. But as you can see below there are quite few steps to be performed.
Making this cam toy is expected to take between 1 and 4 hours
Cutting Out The Cardboard
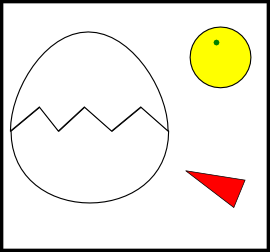
There are no planned fixed sizes for this toy. You can make it as big as you wish. But something like 8cm / 3" sounds reasonable for the egg height. If you follow this, the head of the chicken should be about 1" / 2.5cm in diameter.
Cut these parts from thick cardboard. It's best to start with white cardboard and then paint the chicken head and neb in the desired colors. The eye (which we have chosen to be green) is just painted near the top of the head.
The entire toy will look better if you also outline the loops in black.
Attaching The Gears At The Back
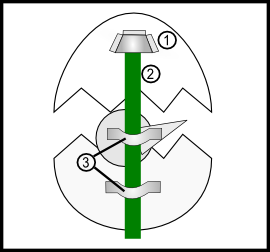
Now you need to attach all the small gears on the back of the egg. Start with sticking down the chicken head to the bottom eggshell and the neb to the head. At the top eggshell you need to create a pouch of fabric or leatherette (1). It will serve as a stopper for the cam follower (2)
The cam follower itself can be made of a small pencil or fulmaster.
Then two holders are needed (3) - one glued to the bottom eggshell and the other to the chicken head to ensure that the follower will move vertically.
At this point the visual part of the cam toy is created. As you can see from the animation here the only thing is to add the cam so you can power an uneven rotation.
Well, in practice doing this is slightly more complex because you need to ensure stability and good outlook of the toy. To do this in the next step we will build a simple foundation which will keep everything stable and will hide the gears of the toy.
Creating Foundations/Gears Box
For your 8cm high egg a foundation high around 5cm should do well. I'm not giving exact sizes, but the image is proportioned correctly.
Besides the obvious let's focus on three elements: (1) is an opening on the back and is used for the cam rotator to enter the box. The rotator should also be fixed on the front end, at the center (2). You can do this with a small nail. The cam rotator can be made of pencils too. On (3) you need a small opening where the cam follower will show from the top and will move the eggshell. Make the opening not much larger than the cam follower - it will act also as a stopper
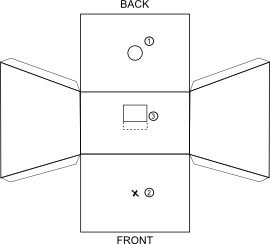
Note also that (3) has a small fold next to the opening. You need to turn this piece up and use it to glue the bottom eggshell to it. This is the only way to ensure that the bottom will stay in place.
A Quick Look At The Gears
This is really a scetchy drawing but it should be cool to show you the simple cam gears inside. (1) is the cam itself - you can make it from wood or plastic, or if you don't have approproate piece, just cut 5-10 equal circles from the cardboard and glue them all together.
The hole where the cam rotator (2) goes should not be in the center of the cam, but close to it's end. Glue the rotator to the cam, if needed use also a nail to stick it there and not let it move. Rotating it should rotate the cam too.
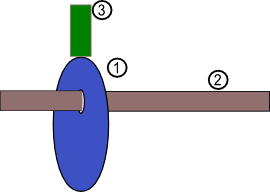

The edges of the cam should be smooth and allow the cam follower (3) slide over it. If needed use some lubricant. To avoid the cam follower slip away of the cam, you can make it's surface concave.
The right end of (2) should bulde enough from the back of the foundation so it's comfortable for screwing with fingers. You can create a small crank for easier manipulation.
This is a simple cam toy but it also requires some planning and skillful work. It's great for a start if this is your first DIY mechanical toy.